⚡️ Quick Start
Ready to optimize your API Consumption with Lunar.dev? Get started in just four easy steps:
- Sign up for a Lunar.dev account (it’s free!)
- Install the Lunar Proxy and Lunar Interceptor
- Access and observe your third-party API consumption through the Lunar Control Plane
- Apply a Lunar plugin to streamline and enhance your API usage
To facilitate a smooth setup, ensure you meet the following prerequisites:
-
Environment Setup: Choose either Docker or Kubernetes for your environment. Having one of these installed is essential for deploying Lunar Proxy.
-
Development Environment: Ensure you have at least one of the following programming environments installed on your system: Python, Node.js, or Java. This is required for installing Lunar Interceptor and integrating it into your application.
Step 1: Sign up for Lunar.dev account
Use this link to sign up for a Lunar.dev account and click “Sign Up”. This will take you to the Lunar Control Plane, the Lunar.dev GUI interface.
Once you’ve created an account, you’ll be shown an empty dashboard and prompted to install the necessary pieces of the Lunar architecture.
Step 2: Install the Lunar Proxy and a Lunar Interceptor
Begin by clicking the “Continue” button to pull up step-by-step instructions on installing the Lunar Proxy.
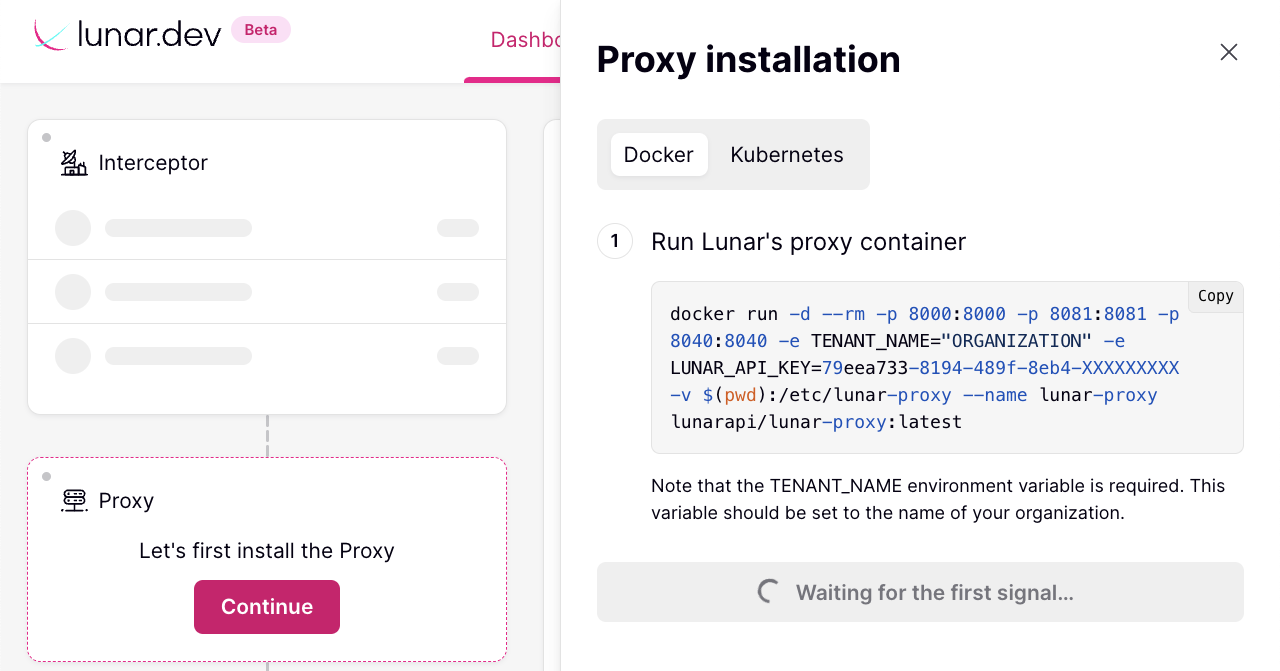
Once the proxy is installed, the next step is installing an Interceptor. Click the “Continue” button again to pull step-by-step instructions for that process. There are several ways to have your API traffic intercepted and sent to the Control Plane. Choose the installation option and language that makes the most sense for your software environment.

Send API consumption data to the Control Plane
Once you have installed the Lunar Proxy and a Lunar Interceptor, you have configured your application to send information about your API calls to the Control Plane. From here, send some third party API requests from your application in order to trigger the data that will be sent to the Lunar Control Plane.
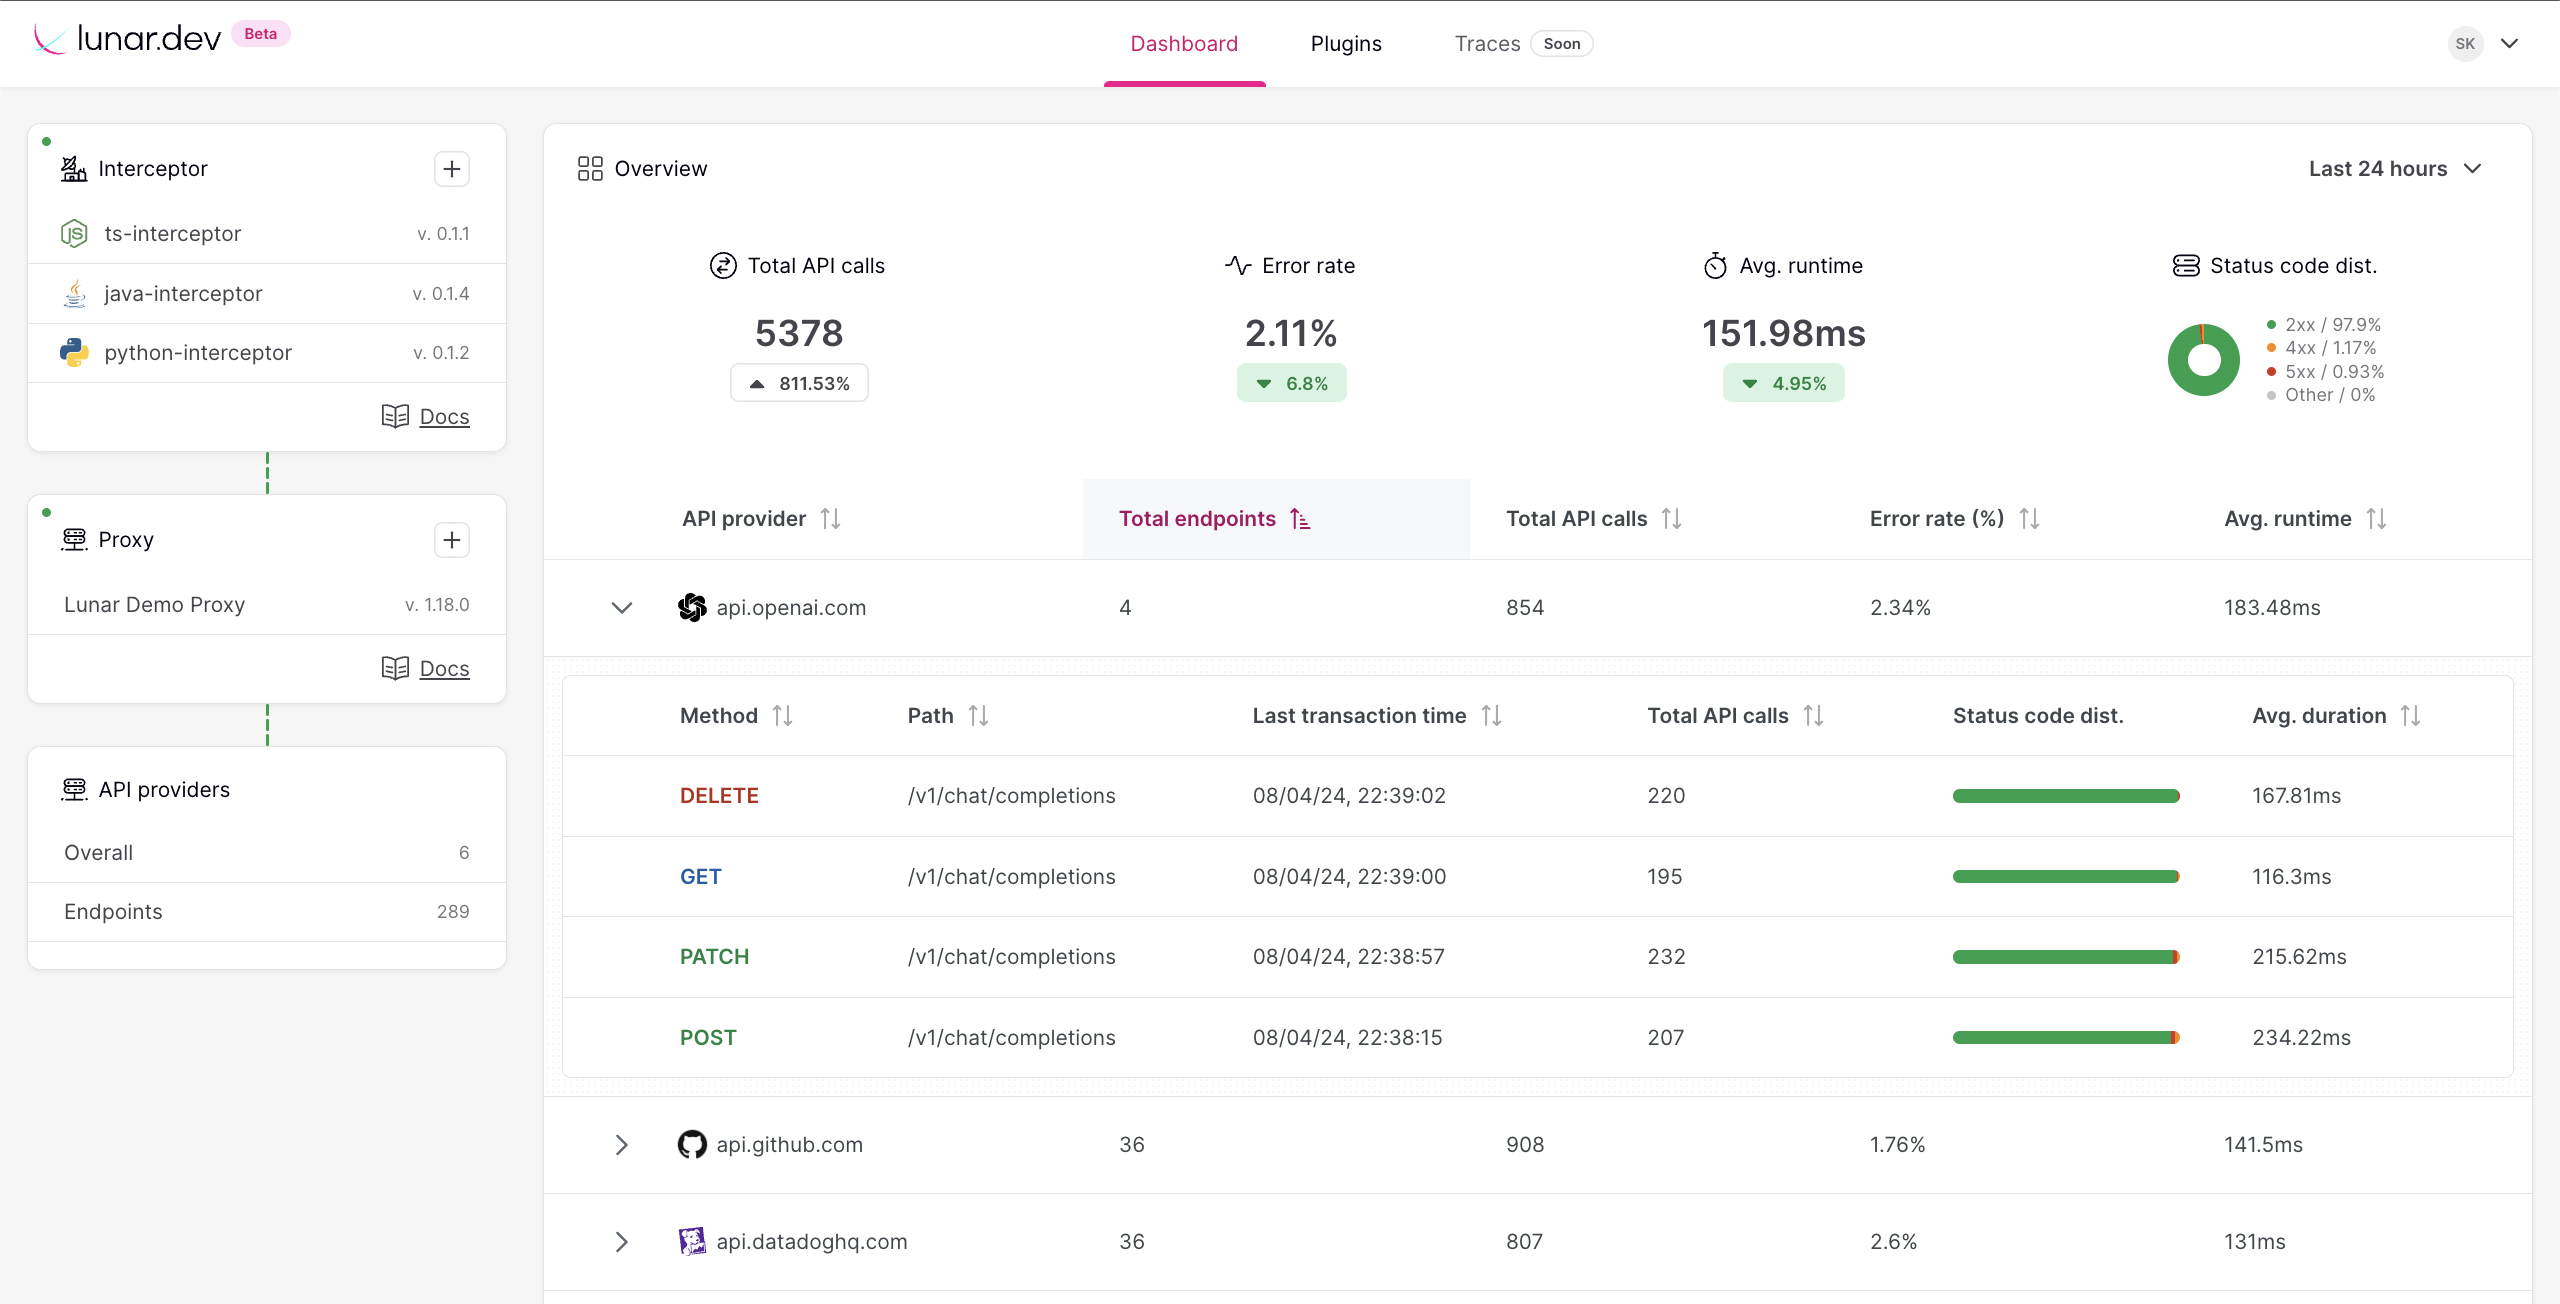
Step 3: Monitor and Observe your API Consumption data
Once your data starts to flow into the Control Plane, you can see high level metrics for our API Consumption at the top of the dashboard. Sort API providers by total endpoints, total API calls, error rate, or average run time. Click on an API provider to drill down into specific endpoint level data for further visibility
Interact with your application by making a few requests. Your API requests data should automatically appear in the Control Plane dashboard!
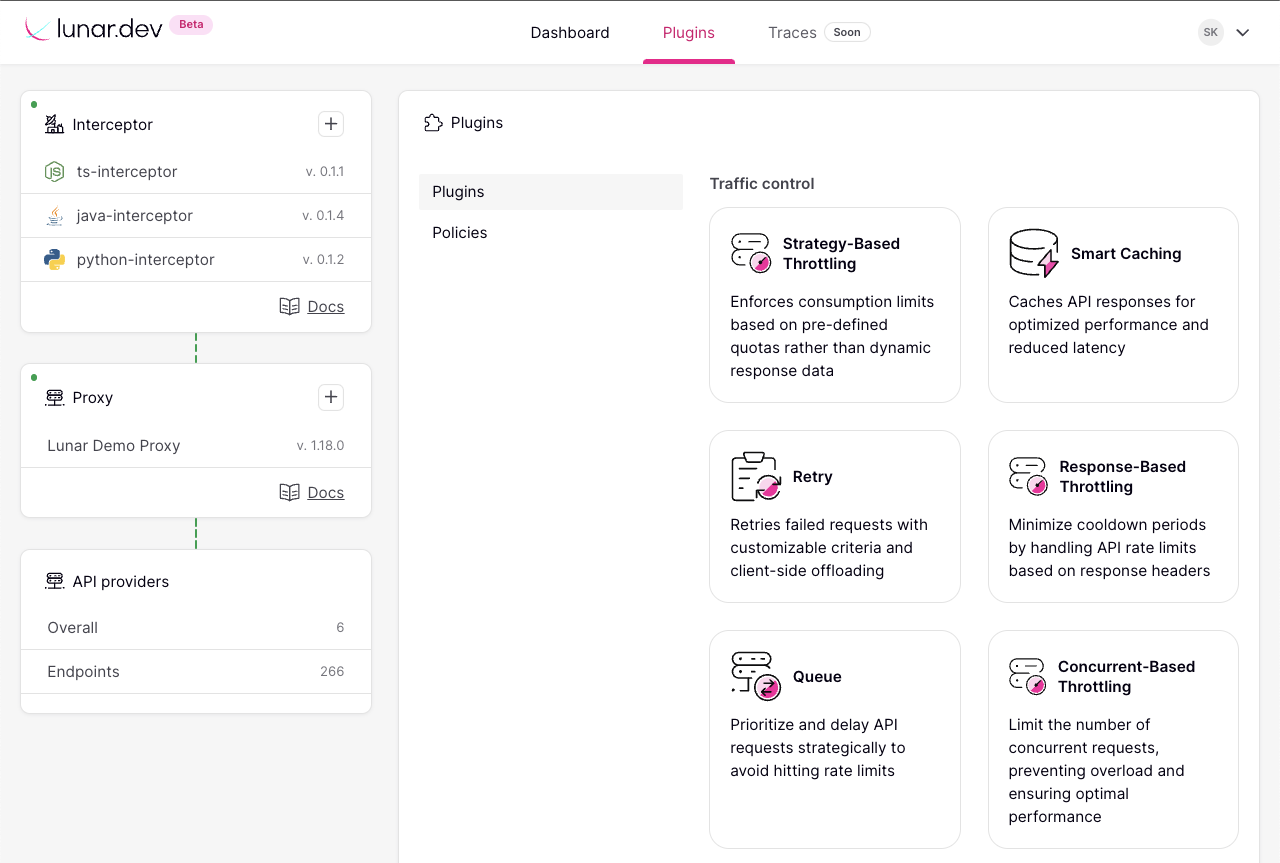
Step 4: View and configure plugins/policies
Navigate to the plugin/policies tab to see all available plugins and policies. To access more detailed information about a plugin, simply click on its preview tile. This action will open a tab on the right side of the GUI, providing comprehensive details about the selected plugin as well as detailed instructions for applying it.
Manual Installation
Alternatively, if you do not want to leverage the Lunar Control Plane, you can install the Lunar architecture without the UI by following the steps below.
Lunar Proxy Installation
- Docker
- Kubernetes
Step 1: Run Lunar's Proxy Container
docker run -d --rm -p 8000:8000 -p 8081:8081 -p 8040:8040 -e TENANT_NAME="ORGANIZATION" -v $(pwd):/etc/lunar-proxy --name lunar-proxy lunarapi/lunar-proxy:latest
Note that the TENANT_NAME environment variable is required. This variable should be set to the name of your organization.
Step 2: Run Post-Installation Health-Check
curl http://localhost:8040/healthcheck
A correct result should be proxy is up.
Step 3: Pass an API Request
curl http://localhost:8000/fact -H "x-lunar-host: catfact.ninja" -H "x-lunar-scheme: https"
Then, use the Discover command to validate that the requests were passed through Lunar Proxy.
docker exec lunar-proxy discover
Step 1: Add and Update Lunar Repository
helm repo add lunar https://thelunarcompany.github.io/proxy-helm-chart/
helm repo update
Step 2: Install Lunar Proxy Helm Chart
helm install lunar-proxy lunar/lunar-proxy --set tenantName=<name> --namespace lunar-proxy --create-namespace
Before installing Lunar's Proxy, ensure that the tenantName is set to the name of your organization, for example: Acme or Google.
Step 3: Run Post-Installation Health-Check
helm test lunar-proxy
Step 4: Pass an API Request
curl http://localhost:8000/fact -H "x-lunar-host: catfact.ninja" -H "x-lunar-scheme: https"
Then, use the Discover command to validate that the requests were passed through Lunar Proxy.
kubectl exec <lunar-proxy-pod-name> -- discover
Lunar Interceptor Installation
Lunar Interceptor needs to be imported to your app. In case you don't have a relevant app in place, refer to our Example Apps
- Python
- Node.JS
- Java
Step 1: Install Lunar Interceptor
pip3 install --upgrade lunar-interceptor
Step 2: Link Lunar Interceptor to Lunar Proxy
export LUNAR_PROXY_HOST="localhost:8000"
This environment variable sets the host and port for Lunar Proxy. Set this to localhost:8000 if you're running Lunar Proxy in a local Docker container. The value assigned to LUNAR_PROXY_HOST should only include the hostname and port, without the HTTP prefix. For example, use localhost:8000 and not http://localhost:8000.
Step 3: Import Lunar Interceptor to Your App
import lunar_interceptor
# imports ...

# your code
def main():
Step 1: Install Lunar Interceptor
npm install lunar-interceptor
Step 2: Link Lunar Interceptor to Lunar Proxy
export LUNAR_PROXY_HOST="localhost:8000"
This environment variable sets the host and port for Lunar Proxy. Set this to localhost:8000 if you're running Lunar Proxy in a local Docker container. The value assigned to LUNAR_PROXY_HOST should only include the hostname and port, without the HTTP prefix. For example, use localhost:8000 and not http://localhost:8000.
Step 3: Import Lunar Interceptor to Your App
require("lunar-interceptor")
# imports ...

# your code
Step 1: Install Lunar Interceptor
wget -O lunarInterceptor.jar https://s01.oss.sonatype.org/content/repositories/releases/dev/lunar/interceptor/lunar-interceptor/0.1.1/lunar-interceptor-0.1.1.jar
Step 2: Link Lunar Interceptor to Lunar Proxy
export LUNAR_PROXY_HOST="localhost:8000"
This environment variable sets the host and port for Lunar Proxy. Set this to localhost:8000 if you're running Lunar Proxy in a local Docker container. The value assigned to LUNAR_PROXY_HOST should only include the hostname and port, without the HTTP prefix. For example, use localhost:8000 and not http://localhost:8000.
Step 3: Import Lunar Interceptor to Your App
Enable the instrumentation agent by using the -javaagent flag with the JVM.
export JAVA_TOOL_OPTIONS="-javaagent:PATH/TO/lunarInterceptor.jar"
Step 4: Run Your App and Validate Proxy/Interceptor Linkage
Run your app and consume API traffic. Then, use the Discover command to validate that the requests were passed through Lunar Proxy, and that your installed interceptor is correctly listed.
- Docker
- Kubernetes
docker exec lunar-proxy discover
kubectl exec <lunar-proxy-pod-name> -- discover
Configuration
Configure the policies.yaml file
After confirming successful installations of Lunar Interceptor and Lunar Proxy, enhance your API consumption with a remedy plugin. Think of it as a customizable tool that simplifies problem-solving and smoothens API interactions by establishing rules for different scenarios.
In this example, we'll apply the strategy-based-throttling plugin. Edit your policies.yaml file from step two with the provided plugin configuration.
global:
    remedies:
      - name: Strategy Based Throttling Quick Start
        enabled: true
        config:
          strategy_based_throttling:
            allowed_request_count: 100
            window_size_in_seconds: 60
            response_status_code: 429
In the above example, the plugin will enforce a limit of 100 requests per minute for all requests. If the limit is exceeded, the plugin will return a 429 HTTP status code.
Allowed and Blocked Domains Configuration
You can control which domains are allowed or blocked using the optional allowed_domains or blocked_domains configurations in your policies.yaml file. This feature also supports regex implementations, *example.com - would allow dev.example.com and help.example.com.
Usage
- If
allowed_domainsis not defined: All domains are allowed. - If
allowed_domainsis defined: Any domain not matching the values in allowed_domains will be blocked. - If
blocked_domainsis not defined: No domains are blocked.
Example Configuration
allowed_domains:
  - "api.io"

blocked_domains:
  - "comp.io"

global:
  remedies:
    - name: Strategy Based Throttling Quick Start
      enabled: true
      config:
        strategy_based_throttling:
          allowed_request_count: 6
          window_size_in_seconds: 60
          response_status_code: 429

#### Apply Policy

After making changes to your local `policies.yaml` file, use the `apply_policies` command to apply the new policies.

```bash
docker exec lunar-proxy apply_policies
What's Next?
- Lunar Sandbox: Try out Lunar in the interactive sandbox - no installation required!
- Demo video: Check out this demo video for a quick start.
- Download Example App: Explore Lunar in action with our example apps, already configured to work with Lunar Proxy.
- Get in touch: For any questions, feel free to reach out to us at info@lunar.dev.